Alternative Process Tutorials

Safelights and Testing
for Alt Photography
Safelights allow us to work (and see) without fogging our papers. Fogging is seen first as damaged highlights. Everything on the fogged print is slightly gray, no whites exist in the image area (see illustration B). In extreme cases, nothing in the image area is brighter than a mid tone gray.
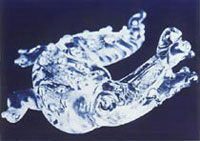
Illustration A: Normal Print

Illustration B: Fogged print
Safelights in conventional (silver gelatin) printing are typically dim and red. Happily, we can work in better light with most alt processes. In general, low level tungsten light (normal electric light bulbs) is safe. Fluorescents, sunlight, and daylight should be avoided, as they contain enough UV energy to fog many alt processes.
Place a piece of white paper in your work area and meter it with a camera or reflective meter. You are probably safe if you get an exposure of F5.6 at 1/4 second or longer (at ASA 100). I have tested at this light level with many processes, and have not seen fogging with alternative process papers in less than one half hours time. Because your coating plus drying time may exceed a half hour, you'll want a truly dark room to let your paper dry in.
I'm a big fan of people doing tests themselves, rather than simply taking other peoples "word". One learns so much more that way. There are simply too many variables in this world. Does my light bulb enclosure block more UV than yours? Are South American light bulbs different in output than USA bulbs? Is a Philips 75W bulb different than a GE? So, I do suggest that anyone coating paper do a simple fog test.
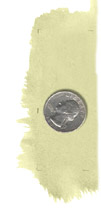
Coat a piece of paper (in the dark) and find the exposure without a negative (in your usual UV light source) that gives the first barely visible gray in a processed and dried print. Next coat another piece (in the dark) and give it this same exposure, but don't process it. Now cut this paper into 3 pieces. Put a large heavy coin on each piece of paper and leave it in your room with the desired lights on. Label and remove one after 15 minutes, another after 30 minutes, the last one after an hour.
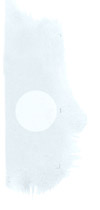
Process and dry the test prints, and see if the coin's shadow shows as a lighter tone than the rest of the test print (see illustration E). If the coin is visible, you have fogged the paper and your lights are not safe.
|

|
|
| Illustration C: Paper and coin ready for test |
Illustration D: A passing result |
Illustration E: A failing result |
Why go to the trouble of pre-exposing to "first barely visible gray"? Most, if not all, light sensitive materials have a "threshold" that must be passed before they start to react. It takes some number of photons hitting the emulsion to turn it on. Say that number is 10. If your safe light gives 9, then you don't see fogging. But then you put it, with your negative, into the UV and expose. That highlight you wanted as paper base gets 5 photons through the negative, It has now gotten 14 photons, and prints as a slight gray, rather than paper base white. Oops, fogging where you didn't think it would be. If we pre expose the test paper to a "first barely visible gray", then any additional photons affecting the paper will be visible. The above explanation will not be correct to a knowledgeable scientist (I don't know how to count photons!), but the ideas are sound.