Alternative Process Tutorials

Alternative Process Tutorial #12
Palladium and Platinum Printing
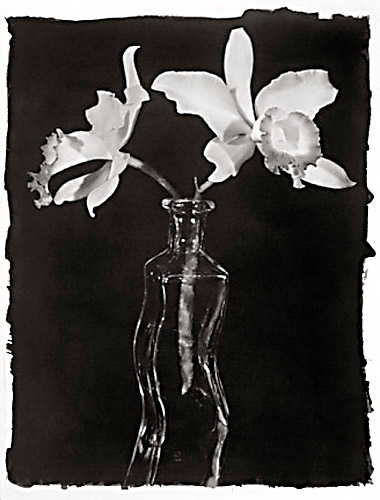
Illustration #98: Platinum/Palladium Print
Copyright © 1996 by Tom Ferguson
Click on image for larger view
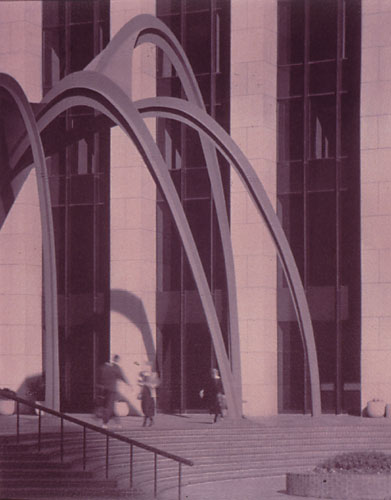
Illustration #99: Gum Print
Copyright © 1994 by Tom Ferguson
Click on image for larger view
Platinum may be the "king' of alt photography. It is the most practiced, most exhibited, and is certainly the best known of all alt processes. It is also one of the most archival. A well processed Platinum/Palladium (Pt/Pd) print may last longer than the paper it is on! It is also one of the more expensive alt processes. Interestingly, it is visually closer to modern silver gelatin than most of the lesser known alt processes. Platinum prints are black and white with quite high resolution. They differ from modern material in a few important ways. They tend to have a warmer (browner) toned black. The image is actually on and inside of the paper fibers, where modern paper's image sits on top of a clay coating. This gives platinum prints a much more "tactile" look.
Platinum and palladium are two closely related chemicals and alternative process printing methods. Most people mix the two metals together to get an optimal mixture. It is rare to see, and expensive to make, a pure platinum print.
In order to complete this tutorial you will need to get the materials listed below. By far the simplest and best source for chemistry and paper is Bostick and Sullivan Click here to visit B&S. There are 7 chemicals needed for this tutorial. The first four chemicals make up the coating solution. Buy these in the small (25ml) bottles and purchase an eyedropper bottle top (see illustration #101) for each of these four chemicals. In the small quantities we will be using, measuring by drop is far easier than using a graduate. You will also need your choice of a brush or coating rod (from tutorial 4).
Coating Chemicals:
Solution #1 (25ml)
Solution #2pd (25ml)
Solution #3-Palladium (25ml)
Solution #3-Platinum (25ml)
Four eyedropper bottle tops
Developer:
Ammonium Citrate Developer (1 quart)
Clearing Bath:
EDTA Tetra Sodium (100 grams)
Sodium Sulfite (100 grams)
Paper:
Cranes Platinotype (white or natural)
Trays:
Five standard photo trays not used for any silver processes
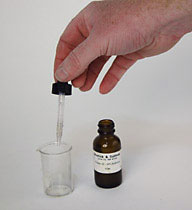
Illustration #101: Using Eyedropper
Optimally you will want a negative with more density range than used for your cyanotype print in tutorial 6. Note that the film development guideline for Pt/Pd negs (below) suggest longer development than the cyanotype negs guideline in tutorial 6 did. My suggested starting point for a normal T-Max 400 neg and cyan was 5:15, below you'll see I'm suggesting 11:00.
One large advantage with Pt/Pd printing is that we can fine tune the contrast of our paper when mixing the coating chemicals. Solution #2pd has a chemical in it that increases the contrast of the resulting chemical. This allows us to make different contrast papers, similar to different graded silver gelatin papers or variable contrast filters. Unfortunately, too much #2pd in our coating causes the print to be "grainy" looking. This is why I've marked mixture "C" (below in the mixing chart) as normal. This is what we will use for testing and will "aim" our negatives at.
Below are some suggested personal film speeds and development times if you want to start shooting negatives optimized for Pt/Pd prints. Developer used is Kodak HC-110. You will get far better results from doing your own testing! I explained how to determine your own personal film speed in tutorial 9, how to determine your own personal development time in tutorial 10. Plus and minus ranges are will be explained in tutorial 18.
HP 5 Plus (film) and HC-110 (developer): For Palladium/Platinum:
| RANGE | FILM SPEED | DEVELOPER TIME | DEVELOPER DILUTION | LAB INSTRUCTIONS |
| Minus 1 | 100 | 7:30 | 30ml per liter | Push 1/2 stop |
| Normal | 125 | 11:00 | 30ml per liter | Push 1-1/2 stop |
| Plus 1 | 160 | 14:00 | 50ml per liter | Push 2-1/2 stops |
T-Max 400 (film) and HC-110 (developer): For Palladium/Platinum:
| RANGE | FILM SPEED | DEVELOPER TIME | DEVELOPER DILUTION | LAB INSTRUCTIONS |
| Minus 1 | 125 | 7:30 | 30ml per liter | Push 1/2 stop |
| Normal | 125 | 11:00 | 30ml per liter | Push 1-1/2 stop |
| Plus 1 | 160 | 12:30 | 50ml per liter | Push 2-1/2 stops |
The above assumes Crains Platinotype Paper and sunlight or type 350 bulbs. Other papers or light sources WILL change data.
Prepare the paper as you did in tutorial 5. For a 4x5 negative and brush coating: use a pencil and mark a 5x6 inch box in the center of a 9x10 inch sheet of paper. For a 4x5 negative and rod coating: use a pencil and mark a top and bottom line 6 inches apart in the center of a 9x10 inch sheet of paper. You will need to coat at least two sheets of paper for each negative you intend to print, one for a test strip and another for your final print.
Mix the chemical and coat your paper in dim incandescent light to avoid fogging. Do not work in sunlight of fluorescent light. See tutorial #3 for further safe light info.
Turn on your room's ventilation and put on your safety gloves (see tutorial 3). Place one of the eyedropper tops on each of the four 25ml chemistry bottles. In order to avoid cross contaminating your chemistry, always keep the same eyedropper with the same chemical. You will need a small glass or plastic container similar to a Shoot glass to mix the coating in (see illustration #101). You are going to put a number of drops from each of the four bottles into the "Shoot glass". The exact formula (see below) will be adjusted according to your negative. When all four chemicals are added together, give them a gentle shake (swirl) to mix them, then pour onto your paper and coat as you did in tutorial 5.
If you are printing a negative developed as suggested above you should start with the "C (normal)" mixture. If you are printing with a negative for modern silver or cyanotype printing you should start with mixture "F". The formulas below are for a 4x5 inch negative (5x6 inch coated area). Use 3.5 times below for 8x10 negatives ( 9.5x11.5 coated area). Use 7 times below for 11x14 negatives (13x16 coated area).
As with cyanotype paper, let your coated paper dry in total darkness. In Southern California (quite dry), paper dries in about 1/2 hour.
BRUSH COATED: 4x5 negative (5x6 inch coated area)
| GRADE | DR | #1 | #2pd | PLAT | PALLAD |
| A (soft) | 6-1/3 stops | 8 | 0 | 3 | 5 |
| B | 5-2/3 stops | 7 | 1 | 3 | 5 |
| C (normal) | 5 stops | 5 | 3 | 3 | 5 |
| D | 4-2/3 stops | 4 | 4 | 3 | 5 |
| E | 4-1/3 stops | 3 | 5 | 3 | 5 |
| F (hard) avoid: grainy |
4 stops | 0 | 8 | 3 | 5 |
BRUSH COATED: 8x10 negative (9x11 inch coated area)
| GRADE | DR | #1 | #2pd | PLAT | PALLAD |
| A (soft) | 6-1/3 stops | 26 | 0 | 10 | 16 |
| B | 5-2/3 stops | 23 | 3 | 10 | 16 |
| C (normal) | 5 stops | 16 | 10 | 10 | 16 |
| D | 4-2/3 stops | 13 | 13 | 10 | 16 |
| E | 4-1/3 stops | 10 | 16 | 10 | 16 |
| F (hard) avoid: grainy |
4 stops | 0 | 26 | 10 | 16 |
ROD COATED: 4x5 negative (5x6 inch coated area)
| GRADE | DR | #1 | #2pd | PLAT | PALLAD |
| A (soft) | 6-1/3 stops | 6 | 0 | 2 | 4 |
| B | 5-2/3 stops | 5 | 1 | 2 | 4 |
| C (normal) | 5 stops | 4 | 2 | 2 | 4 |
| D | 4-2/3 stops | 3 | 3 | 2 | 4 |
| E | 4-1/3 stops | 2 | 4 | 2 | 4 |
| F (hard) avoid: grainy |
4 stops | 0 | 6 | 2 | 4 |
ROD COATED: 8x10 negative (9x11 inch coated area)
| GRADE | DR | #1 | #2pd | PLAT | PALLAD |
| A (soft) | 6-1/3 stops | 20> | 0 | 7 | 13 |
| B | 5-2/3 stops | 17 | 3 | 7 | 3 |
| C (normal) | 5 stops | 13 | 7 | 7 | 13 |
| D | 4-2/3 stops | 10 | 10 | 7 | 13 |
| E | 4-1/3 stops | 7 | 13 | 7 | 13 |
| F (hard) avoid: grainy |
4 stops | 0 | 20 | 7 | 13 |
While your paper is drying you can set up your processing chemicals. Pt/Pd paper must first be developed, then rinsed, the "cleared" in a three step process, then washed. It is quite similar to modern silver gelatin paper processing. The developers, while different chemically, do the same job. In silver you next use a stop bath, in Pt/Pd a plain water rinse. In silver you then use fixer, in Pt/Pd you use a clearing bath. Finally, just like silver gelatin you give it a wash.
Set out 5 photo trays and a one size larger than your negative. Silver is a contaminant to platinum printing. Because of this it is best if you have a dedicated set of trays for Pt/Pd printing. A horizontal print washer (or another photo tray) will be used for washing. The wash tray can be shared with other processes.
The Ammonium Citrate developer (from "Bostick & Sullivan") comes as a dry chemical filling only part of a tall bottle. Fill the bottle with hot water and shake well to mix.
You will pour this developer out of this tall bottle and directly onto your exposed print, making sure to cover the entire image quickly. Let the print soak in the developer for one minute. You will then move the print to the water rinse, and then poor the developer back into the tall bottle. Unlike silver developer, you don't simply leave the developer in the tray. It must be poured onto each print.
This developer works best when warm (about 100 degree F / 38 degrees C). In between prints I keep my tall bottle in a large 2 liter beaker filled with very hot water. Place this next to your first tray.
You second tray should be filled about 1/2 full with room temperature water.
Your third, fourth, and fifth trays will all be filled with the same clearing bath chemical. Mix one tablespoon of EDTA and one tablespoon of Sodium Sulfite into one liter of room temperature water. make enough of this to fill all three trays deep enough to submerge your prints, at least one inch deep.
Your final tray can be a horizontal print washer or a simple photo tray with water running gently into in. Luckily washing Pt/Pd prints is easier that modern silver gelatin prints. Not that much water movement is needed. Do not use an archival vertical washer. Many alt papers will fold and damage themselves if held vertically in moving water.
Now that your processing chemicals are set up, check and see if your paper is dry. It is safe to touch the corner of the coated area with a dry finger. Place the coated paper and your negative in your contact frame, exactly as you did in tutorial 6 (see illustration #102). Next we are going to make a test strip (see tutorial 6). You can print using sunlight (see tutorial 6) or with UV lamps (see tutorial 12). Printing in sunlight is best between 10AM and 3PM on a clear day. A test strip is a series of exposures all on one sheet. When the sheet is "developed", you can find the exposure strip that is most pleasing. This strip's time will then be used for the next exposure. I do not like doing test strips. They take too long, and you don't get to see the entire image at any given exposure, just a slice of it. As this series of tutorials progresses, I will show you how to "measure" your negative and use this measurement to determine your first print time without the test strip.
But, for now, place a piece of black mat board over the top of your contact frame with your negative and coated paper. Place this in the light, and using a watch or timer, remove the mat board and expose for 6 minutes. At the end of this 6 minutes, cover 1/5 of the negative with the black mat board and continue to expose for another 3 minutes. You now have a stripe 1/5 of the negative exposed for 6 minutes, and 4/5 of the negative exposed for 9 minutes (the first 6 minutes plus the second 3 minutes). Next, move the black mat board so that 2/5 of the negative is covered and continue the exposure for another 3 minutes. Next, move the black mat board so that 3/5 of the negative is covered and continue the exposure for another 3 minutes. Finally, move the black mat board so that 4/5 of the negative is covered and continue the exposure for the final 3 minutes. You now have expose test strips of 6, 9, 12, 15, and 18 minutes. A typical exposure is 12 minutes. This varies significantly due to the exposure your negative received, the location you are printing at, and the time of year, and your choice of papers. You may have noticed that these exposure times are twice what you used with cyanotype in tutorial 6. Pt/Pd requires quite a bit more light than cyanotype to reach a correct exposure.
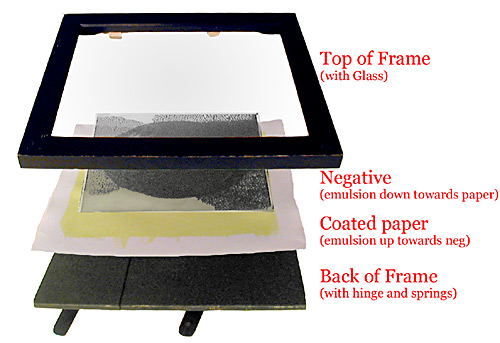
Illustration #105: Item placements
Copyright © 2001 by Tom Ferguson

Illustration #106:
Print draining from corner
Copyright © 2002 by Tom Ferguson
Turn on your room's ventilation and put on your safety gloves (see tutorial 2). You can process in the same dim lighting that you coated the paper in. Place your exposed print into your first (empty) tray. Remove the Ammonium Citrate developer from it's hot water. Do not allow any water drops from the bottle to hit the print. Quickly pour the developer onto the print, coving the entire piece of paper. let the print soak in this chemical with only light tray rocking as agitation for a full minute.
Move the print gently into the next, plain water rinse tray. Invert the print three times, allowing it to drain from a corner during the first minute (see illustration #106). You will leave the print in this rinse bath for 5 minutes total. For the remaining four minutes invert the print and drain from a corner once a minute. While the print is rinsing, pour the developer back into its tall bottle and return it to its hot water.
Next move the print into the third tray, your first clearing bath. Invert the print, allowing it to drain from a corner,three times during the first minute (see illustration #106). You will leave the print in this clearing bath for 5 minutes total. For the remaining four minutes invert the print and drain from a corner once a minute.
For a test strip, which you intend to throw away give the print a quick rinse and examine it for a pleasant exposure. Drydown is not as bad with Pt/Pd as it was with cyanotype. But, your dark values will slightly deepen when the print dries. Use your chosen time to expose and then process a second sheet of paper. If all of the strips on your test are too dark, half the time's I've given and try again. If all of the strips on your test are too light, double the time's I've given and try again.
For a print or test you intend to keep, move the print from the first clearing bath to the second clearing bath. Proceed with inverting and draining as in the first clearing bath. 5 minutes later move the print to the third clearing bath and repeat. After 5 minutes move the print to your moving water wash, and leave it there for 20 minutes.
Dry the prints flat on a screen or blotter book. You can "squeegee" the back of a Pt/Pd print to speed drying, but do not squeegee the front. The image itself is far too fragile when wet.
You've now made your first "King of the Alt Processes" platinum image!
Click the "next" link below and I will explain how to use your MBT and spot meter to determine printing times without making a test strip.