Alternative Process Tutorials

Alternative Process Tutorial #3
Measuring Chemicals

Illustration #19: Platinum Photo
Copyright © 1994 by Tom Ferguson
Click on image for larger view
Illustration #20: Gum over Palladium Photo
Copyright © 1995 by Tom Ferguson
Click on image for larger view
Mixing photo chemicals is not that different than cooking. Which is NOT to say you should eat your chemicals ;-) You have two options. One is to buy pre-measured "kits". The other is to buy bulk chemicals and, using a scale, mix your own. Not unlike choosing between a boxed ready to make cake mix and a "make it from scratch" baking project. Kits for the processes discussed in this series are available from Bostick and Sullivan and/or Photographer's Formulary (see the "materials" link at the bottom of the page).
A scale is of great use in most alternative processes (see illustration #21). You save money buying bulk chemicals (compared to kits). A scale will allow you to easily make different amounts of solutions and to easily alter the composition of the solutions for creative control. Kits, of course, are easier to learn with and cheaper in the short run (no need to buy a scale "today"). I own a Ohaus 2610g scale and love it. It was purchased used from some very suspicious looking bikers at a swap meet for $15. I've always wondered what they used it for! New, they run about $110. Photographers Formulary sells the Pelouze scale, which is both cheaper and less convenient, but will get you the same results.
To continue with this tutorial you need to acquire:
- Gloves (for safety)
- 2 small bottles (100ml / 4 oz. or larger) with tight (seals well) tops
- A beaker or measuring cup of at least 125 ml / 5 oz.
- A graduate of between 6 and 10ml / one fourth to one half ounce.
- A "stirring rod"(which can be anything from a glass rod to a chemical mixer (see illustration #22).
You can purchase these from a local science supply house or from Photographer's Formulary and/or Tri-Ess (see the "materials" link at the bottom of the page). These five items should only be used for chemistry, never for food!
In addition you either need to buy a classic cyanotype kit or the following:
- A scale capable of measuring 1/2 gram to 100 grams
- A small amount of paper (plain typing or copier paper)
- 25gm/1 oz. (minimum) of Ferric Ammonium Citrate ("green" or "green scaled", not "brown")
- 9gm/0.5 oz. (minimum) of Potassium Ferricyanide
You typically have to buy bulk chemicals in 50gm/2 oz. minimums.
I suggest you "read ahead" and see what other supplies you will need in tutorials # 5 and #6. You need to complete all three of these tutorials before you actually get to hold your first alt print!
Regardless of your kit versus bulk decision: put on gloves and turn on your ventilation. When measuring and mixing dry chemicals, you are handling them at their most concentrated. Be careful. You can work in normal room light, but do not work in your kitchen or anywhere food will be handled. Put paper or plastic down to cover your workspace. This keeps things from getting stained and aids in assuring that your workspace will be chemical free when you are done. Put on your safety gloves.
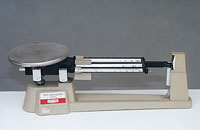
Illustration #21: Scale
Copyright © 2001 by Tom Ferguson
Click on image for larger view
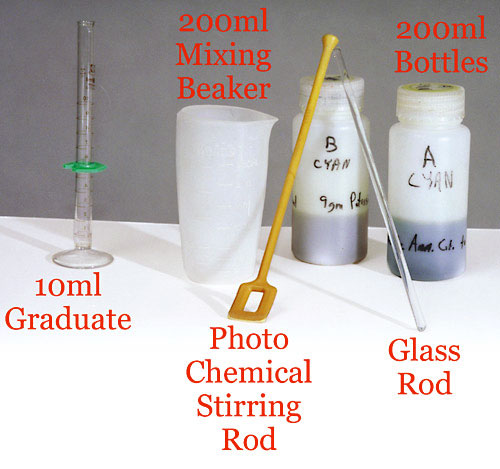
Illustration #22: labware
Copyright © 2001 by Tom Ferguson
Click on image for larger view
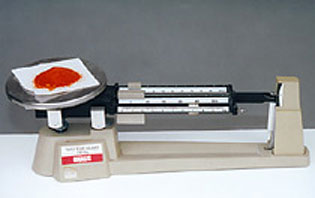
Place a small piece of paper on the scale and zero it. Most scales have a method of calibration that allows the weight of the paper to be zeroed out. On the scale in illustration #21 it is a thumb screw below the chemical plate. If your scale doesn't have a zero adjustment, weigh the paper and add this weight to the chemical weights in the formula. If your paper weights 2 grams, and the formula asks for 25 grams, set the scale to 27 grams (2+25=27).
Set the scale to 25gm and pour ferric ammonium citrate onto the paper until the scale is balanced (See illustration #23). Pour 1/2 of the water (50ml for solution A) into a mixing beaker, then mix in the chemical. Use warm water (80º F to 100º F) and stir vigorously. Then, add enough water to bring the total volume to 100ml. Place this solution in its own bottle and label it "Cyanotype A". Next, place a new (clean) piece of paper on the scale and re-zero it. Set the scale to 9gm and pour potassium fericyanide onto the paper until the scale is balanced. Pour 1/2 of the water (50ml for solution B) into a clean mixing beaker, then mix in the chemical. Use warm water (80º F to 100º F) and stir vigorously. Finally, add enough water to bring the total to 100ml. Place this solution in its own bottle and label it "Cyanotype B".
Formula:
"A": 25gm Ferric Ammonium Citrate (green)
Water to make 100ml
"B": 9gm Potassium Ferricyanide
Water to make 100ml

Illustration #23: Chemicals being measured
Copyright © 2001 by Tom Ferguson
Click on image for larger view
Click the "next" link below and I'll describe two paper coating methods (brush and rod) to use the chemicals we've made.