Alternative Process Tutorials

Alternative Process Tutorial #1
Zone System Basics
Sensitometry is the "science" of how light hitting unexposed film reacts, how development alters this relationship, and how light going through developed film can be printed. All of these three steps can be controlled by the photographer for technical and creative control.

Illustration #5: Cyanotype Photograms
and silver print
Copyright © 1992 by Tom Ferguson
Click on image for larger view
Illustration #6: Platinum Print
Copyright © 1990 by Tom Ferguson
Click on image for larger view
The zone system was created by Ansel Adams and Fred Archer to bring sensitometry out of the laboratory and into the camera bag. It has been applied almost exclusively to black and white work printed on modern silver gelatin paper, but can easily be applied to alt processes. It allows reasonable consistency, as well as many creative options. Since its inception, it has been expanded, contracted, turned into a Zen religion by some, and a science requiring the user to carry and use a computer before every exposure by others. What it should be is a simple system to create high quality negatives for later darkroom interpretation. To expect it to create "perfect" negatives, or absolute consistency, will lead you down the path of frustration, endless testing, and very little time for creative photography.
Virtually all "alternative processes" use black and white negative film. Real world brightness (whites) become black film (heavy opaqueness) which becomes white (highlight) print values. Real world grays become gray film (moderate opaqueness) which becomes gray print values. Real world darkness (blacks) becomes white film (clear film, lack of opaqueness) which becomes black (shadow) print values.
You can control the tones of your final print values by a number of methods, starting with how much exposure your film gets. This primarily sets your "black" (shadow) print values. Your next control is the development time of your film. This primarily sets your "white" (highlight) print values. One of the largest confusions in alternative process work is that each process (cyanotype, palladium, gum) requires a different film development time in order to give correct white (highlight) print values.
Photographers refer to this amount of difference between the thin shadow areas on a negative and the dense highlight areas as "density range". The negative in illustration #8 has a large density range. The negative in illustration #9 has a small density range.
Without some thought and control (unique to each process) you will most likely end up with a "blown out" print (virtually all black and white with no grays, see illustration #8) or a "flat" print (all too dark, or all gray, or all too light, see illustration #9). It is possible to exercise this development control even if you don't have your own darkroom. All "custom" photo labs will "push" film (give it longer development) or "pull" film (give it shorter development).
Because modern silver gelatin paper will accept a wide variety of negatives (and still produce a good print) many photographers feel this degree of control is no longer needed. When you work in alternative processes you will typically have a lot less ability to "fix it later". Getting your negative close to perfect is a requirement for high quality alternative process prints.
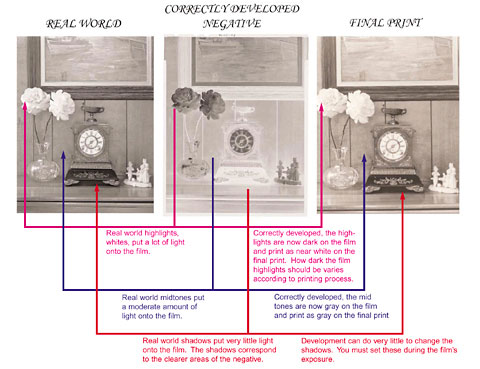
Illustration #7: "Normal" negative,
developed for the correct time for the final print process.
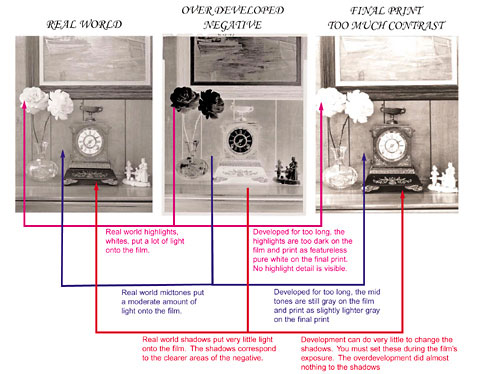
Illustration #8: "Overdeveloped" negative
developed for too long a period of time for the final print process.
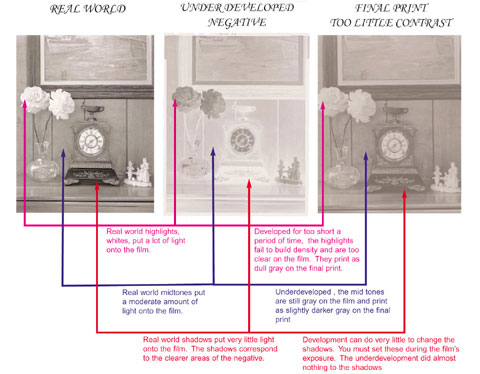
Illustration #9: "Underdeveloped" negative
developed for too short a period of time for the final print process.
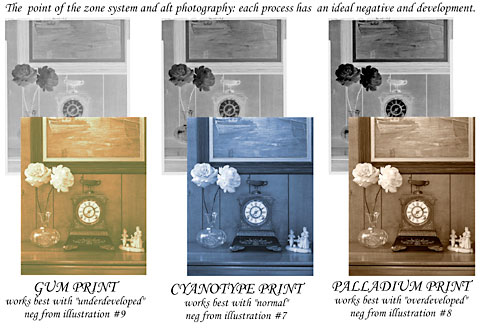
Illustration #10: Matching negative development and process.
First expose for the shadows, then develop for the highlights. This famous Ansel Adam's phrase truly does explain 90% of the zone system!
"First expose for the shadows" means that we can not alter our "shadows" (dark print values) much after exposure. They are set at the time of exposure. Alt processes by their nature need negatives with more shadow separation than modern factory made papers. We need to give our film more exposure than the film manufacturers suggest. This is called shooting at a personal film speed. Typically (for alt) if you are shooting 400 speed black and white negative film, set your camera and/or meter to ASA125. If you are shooting 100 speed black and white negative film, set your camera and/or meter to ASA32. I will explain in tutorial #8 how to test for your own personal film speed.
"Then develop for the highlights" means that we can, and need to, alter the highlights (whites and light gray print values) after exposure. The longer you (or your lab) develop the film, the denser (blacker) the highlights will be on the final negative. Look at the 3 negatives in illustration #10. These were all exposed identically but developed for three different lengths of time. The negative on the left (gum) was developed for slightly shorter than the film manufacturer suggests. The negative in the middle (cyanotype) was developed for about 30% longer than suggested. The negative on the right (palladium) was developed for almost twice as long as suggested by the manufacturer. If this wasn't done, the highlights would not match on the three prints (see illustrations #8 and #9). I will explain how to test for your personal development times in tutorials #9 and #10.
Personally testing photographic materials is an unfortunate necessity. Using the film and developer manufacturers' instructions are useless for alternative process printing. Using the "starting points" I provide in these tutorials are better, but not optimal! We all have different cameras, meters, agitation routines, water, sunshine, and artistic visions. Testing can be done quite easily using a step wedge (see illustration #11), some mat board, your eyes and your choice of two negative reading methods. For the truly low tech, a hole in a piece of paper method will be described. For the slightly higher tech, a simple homemade spot meter modification project will be detailed later in this series. I won't ask you to use a densitometer (much too expensive), create any graphs (too confusing), or deal with any advanced math (logarithm what?).
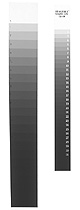
Illustration #11: Kodak (larger) and Stouffer (smaller) step wedges. The Stouffer is preferred for these tutorials.
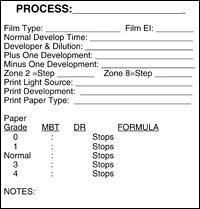
Illustration #12: Process Info card
Click on this image to download a printable (PDF) version.
By the end of this series, you will be able to fill out a card (see illustration #12) for each process. This will allow you to expose and develop your negative correctly for a given process, then quickly measure this negative, determine the grade of alternative paper needed (or that the negative isn't capable of working with that process), and its initial printing time. You'll have a finished print in an hour or two, instead of the days of trial and error so common in alternative process work. Removing the unpredictability of these processes will allow you to find a medium that fits your vision, rather than using the only medium available to you on the camera store shelf.
If you click the "Next Page " link below, you'll find my page on common sense chemical safety. Once we get that out of the way we can start mixing, coating, then exposing our first alt print (a cyanotype).